DL Framework » Pytorch(二)
2021-11-04 :: 7303 WordsPytorch
TorchDynamo(续)
torch.fx参用symbolic tracer技术,通过对Python代码的符号化执行,记录计算图。
缺点:
-
无法捕获dynamic control flow函数。control flow指的是while、if这种,会随着条件而导致代码走向不同分支的语句。symbolic trace只会根据当前的输入捕获相应的分支到计算图中,如果后面输入发生改变就会报错,除非重新进行捕获。
-
无法追踪Non-torch Functions。
dynamo的设计非常巧妙,一言以蔽之:能捕获的我就捕获,捕获不了的,直接保留。
为什么要做模型切分呢?因为模型规模增大,单个机器无法放下,但是又需要访问模型才能制定切分策略。制定切分策略之前,我们又需要知道这个模型有多大。这就是一个先有鸡,还是先有蛋的问题了。
Fake Tensor应运而生,正如其名,FakeTensor什么都是Fake,它的backend是假的,dispatch是假的,storage也是假的。
类似的概念还有Meta Tensor。虽然Meta Tensor同样没有storage和backend,但是这种没有,不仅是物理上没有,就连逻辑上也没有,而Fake Tensor只是物理上没有,在逻辑上,还要假装这些都存在。
DTensor:DistributedTensor
自动求导:
from torch._dynamo.backends.common import aot_autograd
切图:
from torch.fx.passes.infra.partitioner import CapabilityBasedPartitioner
参考:
https://zhuanlan.zhihu.com/p/570989882
Pytorch编译机制的总结(来自吴芃老师)
https://blog.csdn.net/qq_39967751/article/details/128372797
PyTorch 2.0之Dynamo: 窥探加速背后的真相
https://fkong.tech/posts/2023-05-20-dynamo/
一文搞懂TorchDynamo原理
https://www.zhihu.com/answer/3395318281
colossalai团队成员讲解PyTorch
TorchInductor
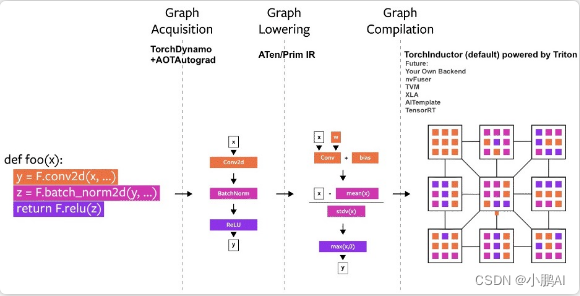
TorchDynamo偏重于Graph的捕获,而TorchInductor偏重于算子级的优化。
经过TorchInductor之后的计算图将是PSC(Pure-and-Statically composed)的,更利于编译优化。
参考:
https://dev-discuss.pytorch.org/t/torchinductor-a-pytorch-native-compiler-with-define-by-run-ir-and-symbolic-shapes/747
TorchInductor: a PyTorch-native Compiler with Define-by-Run IR and Symbolic Shapes
https://zhuanlan.zhihu.com/p/595996564
聊聊PyTorch 2.0(Inductor)
TorchServe
TorchServe是由AWS和Facebook合作开发的PyTorch模型服务库。
代码:
https://github.com/pytorch/serve
参考:
https://mp.weixin.qq.com/s/AtuSS5paEZ_0RvpyLEJk2g
Facebook联合AWS推出PyTorch模型服务框架:可让模型快速投入生产
Hook
https://zhuanlan.zhihu.com/p/362985275
Pytorch获取中间层输出的几种方法
https://zhuanlan.zhihu.com/p/267800207
PyTorch中Hook的简单使用
https://zhuanlan.zhihu.com/p/87853615
pytorch的hook机制之register_forward_hook
https://zhuanlan.zhihu.com/p/152314451
hook技术
Pytorch IR
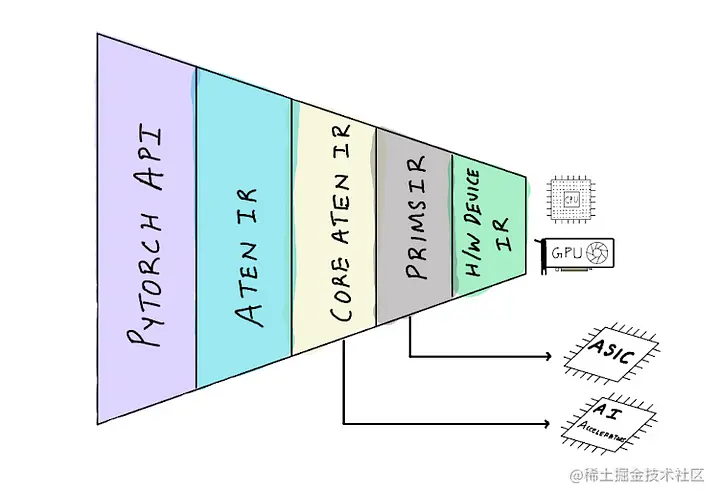
Core Aten IR(以前的canonical Aten IR)是Aten IR的一个子集,可以用来分解Aten IR中的所有其他运算符。针对特定硬件加速器的编译器可以专注于只支持Core Aten IR,并将其映射到他们的低级硬件API。这使得向PyTorch添加硬件支持变得更加容易,因为他们不需要实现对完整的PyTorch API的支持。
Prims IR是Core Aten IR的一个更小的子集,它将Core Aten IR的操作进一步分解为基本操作,使针对特定硬件的编译器更容易支持PyTorch。但是,将运算符分解成越来越低的操作,由于过多的内存写入和函数调用开销,肯定会导致性能下降。但我们期望硬件编译器可以把这些运算符融合在一起,以支持硬件API,从而重新获得性能。
https://juejin.cn/post/7224428335005892645
Pytorch 2.0如何通过运算符融合和CPU/GPU代码生成来加速深度学习
Pytorch Dispatcher
torch.library:
# Override with python
from torch.library import Library, impl
import torch

mylib = Library("aten", "IMPL")

@impl(mylib, "add.Tensor", device_type="CUDA")
def add_override_cuda(a, b):
    print("Using custom CUDA add implementation!")
    return a + b

# Override with C++
#include <torch/library.h>

TORCH_LIBRARY_IMPL(aten, CPU, m) {
    m.impl("add.Tensor", [](const torch::Tensor& a, const torch::Tensor& b) {
        // Your custom implementation here
        return a + b;
    });
}
__torch_function__:
class CustomTensor(torch.Tensor):
    @classmethod
    def __torch_function__(cls, func, types, args=(), kwargs=None):
        kwargs = kwargs or {}
        print(f"Called function: {func.__name__}")
        return func(*args, **kwargs)

# Usage
x = CustomTensor([1, 2, 3])
y = torch.add(x, 1)  # Will print "Called function: add"
__torch_dispatch__:
class DispatchTensor(torch.Tensor):
    @classmethod
    def __torch_dispatch__(cls, func, types, args=(), kwargs=None):
        kwargs = kwargs or {}
        print(f"Dispatching: {func}")
        return func(*args, **kwargs)

    # Do not force the Float8Tensor type on the returned tensor
    __torch_function__ = torch._C._disabled_torch_function_impl

# Usage
x = DispatchTensor([1, 2, 3])
y = torch.add(x, 1)  # Will print the dispatched operation
https://pytorch.org/tutorials/advanced/extend_dispatcher.html
Extending dispatcher for a new backend in C++
https://zhuanlan.zhihu.com/p/376495783
聊聊Pytorch Dispatcher
https://zhuanlan.zhihu.com/p/386876377
Pytorch中dispatch机制及其实现
https://blog.csdn.net/gzq0723/article/details/115410050
Pytorch底层算子扩展最详细的总结
Grad Mode
torch.no_grad vs torch.inference_mode
| Mode | Excludes operations from being recorded in backward graph | Skips additional autograd tracking overhead | Tensors created while the mode is enabled can be used in grad-mode later |
|---|---|---|---|
| default (grad mode) | ✓ | ||
| no-grad | ✓ | ✓ | |
| inference | ✓ | ✓ |
分布式
https://pytorch.org/tutorials/intermediate/dist_tuto.html
Writing Distributed Applications with PyTorch
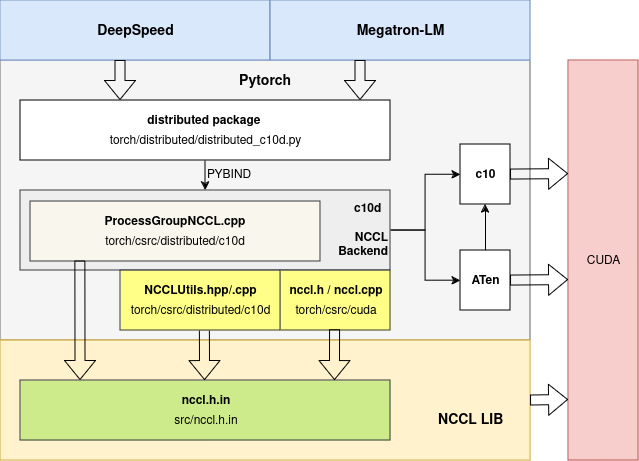
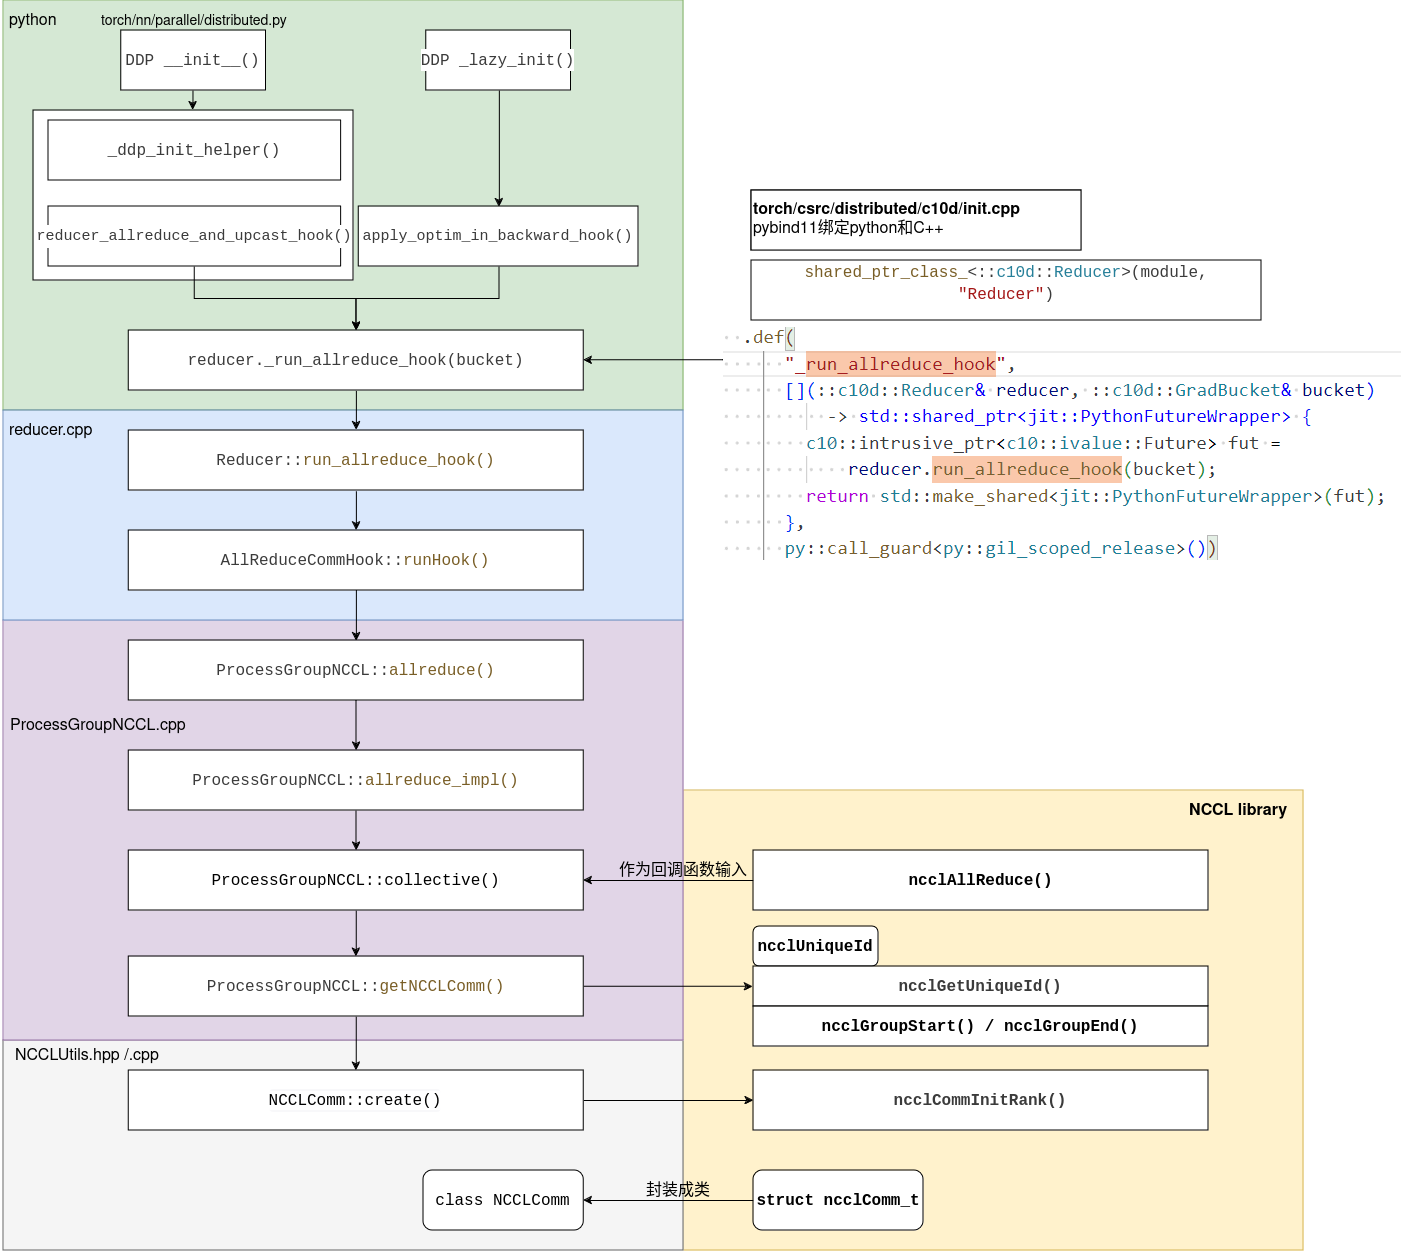
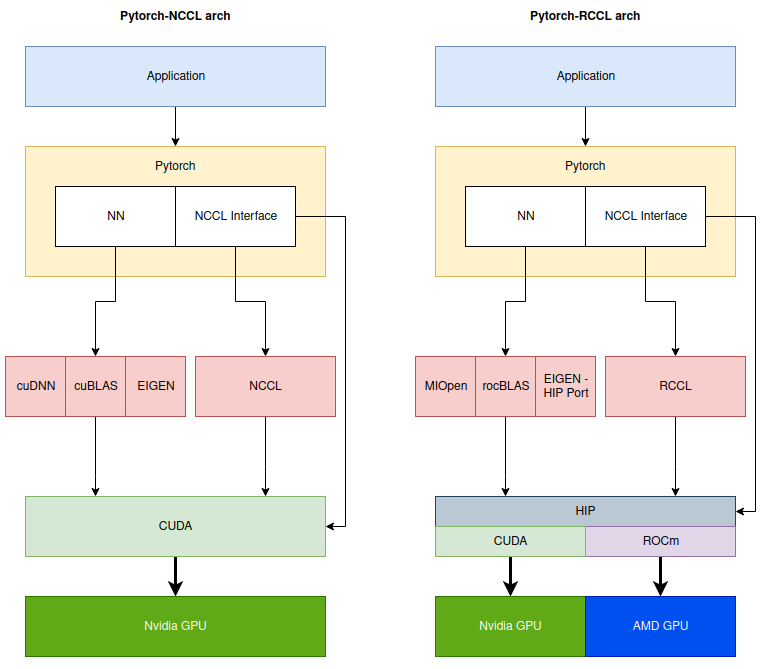
pytorch可以直接调用NCCL Lib APIs,或者对起进行一层封装:
- torch/csrc/distributed/c10d/ProcessGroupNCCL.cpp –> 直接调用NCCL LIB
- orch/csrc/distributed/c10d/NCCLUtils.hpp –> 对NCCL LIB中的struct ncclComm_t封装成class NCCLComm
- torch/csrc/cuda/nccl.h –> 较为通用的nccl封装,不仅仅用来做分布式训练
torchrun --nnodes 2 --nproc-per-node=4 --rdzv_backend=c10d --rdzv_endpoint=$MASTER_ADDR a.py
官方文档:
https://pytorch.org/docs/stable/elastic/run.html
https://pytorch.org/docs/stable/elastic/quickstart.html
DataParallel:
replicas = self.replicate(self.module, self.device_ids[: len(inputs)])
outputs = self.parallel_apply(replicas, inputs, module_kwargs)
return self.gather(outputs, self.output_device)
针对LLM的训练,pytorch官方还发起了torchtitan项目:
https://github.com/pytorch/torchtitan
参考:
https://zhuanlan.zhihu.com/p/675464874
一文读懂分布式训练启动方式
https://zhuanlan.zhihu.com/p/486130584
Pytorch-多机多卡极简实现
https://zhuanlan.zhihu.com/p/76638962
Pytorch分布式训练
https://zhuanlan.zhihu.com/p/360405558
PyTorch分布式训练
https://mp.weixin.qq.com/s/0aSBHvscloEnPMRLyNjQsg
PyTorch分布式训练简明教程
https://blog.csdn.net/orangerfun/article/details/123887725
torch分布式训练
https://mp.weixin.qq.com/s/r7kt1k7D1wurWs_uxdLCtg
PyTorch源码解读之分布式训练
https://pytorch.org/tutorials/intermediate/model_parallel_tutorial.html
Single-Machine Model Parallel Best Practices
Backend
PyTorch带着左右护法Deepspeed,Megatron在研究领域,大模型领域,硬把Tensorflow干成了others。金主爸爸们,各种大模型训练和推理的客户,都拿着PyTorch + Megatron + Deepspeed的组合让我们适配。
硬件公司如果想支持pytorch基本只有这样的几条路:
1.维护一个自己的fork,然后在里面仿照cuda kernel的注册方式来注册新kernel。这样在实现上是最简单的,但不管是后期维护还是客户使用都非常麻烦。因为这种fork项目很容易卡在某一个版本上:很难用自动的方式把每一个pytorch的新commit都cherry-pick过来,而有能力能手动合并代码的人往往也不愿意把精力花在这种没有啥产出的工作上。
2.通过torchscript/ONNX作为中转来实现插件。大致的思路就是用torch.jit.trace得到图,然后一步一步lower到某个custom的IR上(例如MLIR),最后转到自己的backend。
API:torch.jit.load
这样的好处是客户不用换pytorch了,但是问题在于torch.jit.trace或者torch.jit.script都是有比较大的局限性的,前者直接抛弃了控制流,使得像kvcache这样的LLM inference必备优化实现得很难受,后者则是有各种各样的小坑。
3.pytorch2mindspore,通过monkey patch的逻辑直接在Python API侧通过对等接口进行拦截,实现脚本直接运行在mindspore平台;Graphcore早期也使用了这种方案。
4.基于PrivateUse1的插件方案。
5.基于Pytorch TorchDynamo的接入方案。
昇腾Pytorch backend的代码:
https://gitee.com/ascend/pytorch
Intel Pytorch backend的代码:
https://github.com/intel/intel-extension-for-pytorch
https://www.zhihu.com/question/624955377
如何看待pytorch2.1,原生支持华为昇腾NPU?
https://zhuanlan.zhihu.com/p/664923219
昇腾PyTorch插件化适配的优势与局限
https://pytorch.org/tutorials/advanced/privateuseone.html
Facilitating New Backend Integration by PrivateUse1
https://mp.weixin.qq.com/s/VtjGJfrBmWxVM3KjOEGFBw
OpenReg:基于PyTorch “PrivateUse1”机制的独立树外后端实现
https://pytorch.org/blog/openreg-a-self-contained-pytorch-accelerator-simulator/
OpenReg: A Self-Contained PyTorch Accelerator Simulator
https://github.com/bdhirsh/pytorch_open_registration_example
一个PrivateUse1的示例
苹果使用Metal Performance Shaders(MPS)作为PyTorch的后端,可以实现加速GPU训练。
https://zhuanlan.zhihu.com/p/517699916
Pytorch Mac GPU训练与测评

您的打赏,是对我的鼓励
