DL Framework » TensorFlow(二)
2017-11-10 :: 6813 Words- 图计算(续)
- 控制流
- 多核(multicore),多线程(multi-thread)
- tf.data
- Eigen
- Eager Execution
- Tensorflow 2.x
- cross-compile
- TensorFlow高层封装
图计算(续)
图计算的大致步骤如下:(这里以OpenVX函数为例,因为它更接近底层和硬件。)
1.vxCreateGraph。创建计算图。
2.vxProcessGraph。运行计算图。
在大多数Tensorflow示例中,你看不到Graph的身影。但它并不是不存在,而是默认所有新加入的Operation都添加到默认的Graph。
以下是使用多个Graph的示例:
import tensorflow as tf
g1 = tf.Graph()
with g1.as_default():
    c1 = tf.constant([1.0])
with tf.Graph().as_default() as g2:
    c2 = tf.constant([2.0])

with tf.Session(graph=g1) as sess1:
    print sess1.run(c1)
with tf.Session(graph=g2) as sess2:
    print sess2.run(c2)
Tensorflow对计算图的简化,不仅在于使用默认的Graph。还在于可以只计算部分的Graph。部分Graph,也被称作Sub Graph。
以上面的softmax运算为例,如果sess.run(add)的话,后面的ReLU和softmax运算都不会被执行。
反过来,如果只想执行ReLU和softmax的话,则可以sess.run(softmax, feed_dict={add: add_tensor})。也就是把Sub Graph的output作为sess.run的参数,而把input作为feed_dict的参数。
虽然图计算是Tensorflow的主要使用方式,然而一般性的tensor计算(即非图计算),也是完全可行的。Tensorflow没有提供相关的API,直接使用numpy就可以了。
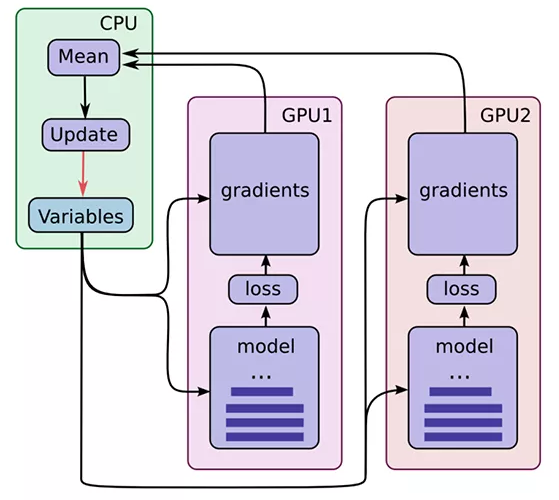
下面的动图形象的展示了计算图的前向和后向运算的过程:
参考:
http://www.algorithmdog.com/dynamic-tensorflow
动态图计算:Tensorflow第一次清晰地在设计理念上领先
https://zhuanlan.zhihu.com/p/23932714
YJango的TensorFlow整体把握
http://www.cnblogs.com/lienhua34/p/5998853.html
Tensorflow学习笔记2:About Session, Graph, Operation and Tensor
控制流
tf.cond
a=tf.constant(2)
b=tf.constant(3)
x=tf.constant(4)
y=tf.constant(5)
z = tf.multiply(a, b)
result = tf.cond(x < y, lambda: tf.add(x, z), lambda: tf.square(y))
with tf.Session() as session:
    print(result.eval())
tf.case
decode_png = lambda :tf.image.decode_png(image_tensor, channels)
decode_jpg = lambda :tf.image.decode_jpeg(image_tensor, channels)
decoder = { tf.equal(image_ext, '.png'):  decode_png,
            tf.equal(image_ext, '.jpg'):  decode_jpg}
image_tensor = tf.case(decoder, default = decode_png, exclusive = True)
控制流对于多数的AI加速硬件并不友好,违背了Directed Acyclic Graph的假设。所以针对这一点,TF亦提出了condition sub graph和body sub graph的概念。
多核(multicore),多线程(multi-thread)
在Tensorflow程序中,我们会经常看到”with tf.device(“/cpu:0”): “ 这个语句。单独使用这个语句,而不做其他限制,实际上默认tensorflow程序占用所有可以使用的内存资源和CPU核。
参考:
http://deepnlp.org/blog/tensorflow-parallelism/
Tensorflow并行:多核(multicore),多线程(multi-thread)
tf.data
tf.data提供了一套构建灵活高效的输入流水线的API。
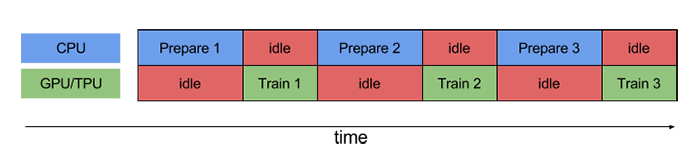
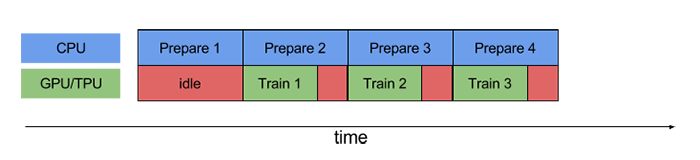
上面两幅图中,第一幅图是没有使用流水线的情况,而第二幅图则是使用流水线的情况。
参考:
https://mp.weixin.qq.com/s/dfXTV4PFgC1Wbti42Zf4wQ
tf.data API,让你轻松处理数据
https://mp.weixin.qq.com/s/mjUnrPBPBuY6XKXkUymX-w
实例介绍TensorFlow的输入流水线
https://mp.weixin.qq.com/s/1ZlyVDJK6RWZ_1Ox7399IA
用一行tf.data实现数据Shuffle、Batch划分、异步预加载等
Eigen
Eigen是一个线性代数方面的C++模板库。tensorflow和caffe2都使用了这个库。
官网:
http://eigen.tuxfamily.org/
使用Eigen也比较简单,无须link,只要引用相关头文件即可。
参见:
https://zhuanlan.zhihu.com/p/26512099
tensorflow和caffe2
https://www.zhihu.com/question/28571059
Eigen的速度为什么这么快?
Eager Execution
TensorFlow的Eager Execution可立即评估操作,无需构建图:操作会返回具体的值,而不是构建以后再运行的计算图。这也就是所谓的动态图计算的概念。
参考:
https://mp.weixin.qq.com/s/Yp2zE85VCx8q67YXvuw5qw
TensorFlow引入了动态图机制Eager Execution
https://github.com/ZhuanZhiCode/TensorFlow-Eager-Execution-Examples
Eager Execution的代码示例
https://github.com/madalinabuzau/tensorflow-eager-tutorials
TensorFlow的动态图工具Eager怎么用?这是一篇极简教程
https://mp.weixin.qq.com/s/Lvd4NfLg0Lzivb4BingV7w
Tensorflow Eager Execution入门指南
https://github.com/snowkylin/TensorFlow-cn
简单粗暴TensorFlow Eager教程
https://github.com/snowkylin/tensorflow-handbook
简单粗暴TensorFlow 2.0
https://mp.weixin.qq.com/s/zz8XCykJ6jxbE5J4YwAkEA
一招教你使用tf.keras和eager execution解决复杂问题
Tensorflow 2.x

import tensorflow
main_version = tensorflow.__version__.split('.')[0]
if int(main_version) == 2:
    import tensorflow.compat.v1 as tf
    tf.compat.v1.disable_v2_behavior()
    import tensorflow.compat.v1.lite as tflite
else:
    import tensorflow as tf
    import tensorflow.contrib.lite as tflite
https://mp.weixin.qq.com/s/BD-nJSZJLjBBq1n7HEHpKw
将您的代码升级至TensorFlow 2.0
https://mp.weixin.qq.com/s/xgsUF97aI1YfGSdh0FJ6Cw
都在关心TensorFlow 2.0,那我手里基于1.x构建的程序怎么办?
https://mp.weixin.qq.com/s/s8hAYadCw9-_BpWSCh38gg
TensorFlow 2.0:数据读取与使用方式
https://mp.weixin.qq.com/s/rVSC1AXj9YECjUrl5PkSGw
详解深度强化学习展现TensorFlow 2.0新特性
https://mp.weixin.qq.com/s/8D8kxFSfruwWhU2jmYL3sg
Google大佬Josh Gordon发布Tensorflow 2.0入门教程
https://cloud.tencent.com/developer/article/1498043
有了TensorFlow2.0,我手里的1.x程序怎么办?
https://mp.weixin.qq.com/s/ddHKc5AffznRaEY_qhHN_g
升级到tensorflow2.0,我整个人都不好了
https://mp.weixin.qq.com/s/RcolwQnCqrAsGaKEK0oo_A
TensorFlow 2.0中的tf.keras和Keras有何区别?为什么以后一定要用tf.keras?
https://mp.weixin.qq.com/s/BI2BjAJGXzRk4k9d99PgLQ
tensorflow2.4性能调优最佳实践
TensorFlow Addons
TensorFlow SIG Addons是包含社区贡献的代码库,也就是1.x时代的contrib文件夹内的内容。一般用tfa作为包前缀。
cross-compile
TF的交叉编译不是不好用,而是非常不好用。。。这一点其实Google内部也心知肚明。但凡能不用bazel的地方,其实Google也不想用,比如TF Lite就提供了CMake的编译选项。
但TF由于是个跨语言的项目(至少包含了Python和C++),所以Bazel还是有一定的优势的。
网上关于TF交叉编译的文章不多,写的比较好的主要有:
https://www.morethantechnical.com/2018/03/08/cross-compile-latest-tensorflow-1-5-for-the-nvidia-jetson-tk1/
Cross-compile latest Tensorflow (1.5+) for the Nvidia Jetson TK1
然而这个已经有点年头了,并不适合新版本的bazel。
其实目前官方代码库中,已经有一些交叉编译的例子了。比如raspberry pi的:
./tensorflow/tools/ci_build/pi/build_raspberry_pi.sh AARCH64
TF也有一个repo用于放置工具链相关的内容:
https://github.com/tensorflow/toolchains.git
我这里是参考toolchains/cpus/arm/cc_config.bzl.tpl来编写适合自己的脚本。
目前可行的编译选项如下:
bazel build --crosstool_top=//cross_compiler:toolchain --cpu=aarch64 --host_crosstool_top=@bazel_tools//tools/cpp:toolchain --distinct_host_configuration=true --config=opt //tensorflow/tools/pip_package:build_pip_package
相关选项的含义如下:
--crosstool_top:指定交叉编译的工具链。
--host_crosstool_top:有些项目实际上需要编译Host版本,比如flatbuffers。这些项目的bazel文件中,往往能找到类似cfg = "host"的选项。因此,这里还需要指定Host的工具链。当然Host的工具链一般都是系统自带的,也许并不需要特殊指定,这时可以使用@bazel_tools//tools/cpp:toolchain这样的默认设置。
--distinct_host_configuration=true:即使配置好Host的工具链,也不代表项目会被按照Host编译。这时就需要打开这个开关了。
最后是打包wheel的环节:
虽然打包出来的wheel文件名字叫做tensorflow-2.7.0-cp39-cp39-linux_x86_64.whl,但是不要紧,相关的cross-compile的内容已经在里面了,只需要将之改名字为tensorflow-2.7.0-cp39-none-linux_aarch64.whl即可。
以下是一些趟坑的细节:
一般来说,标准库的头文件是不需要加入项目的依赖的,如果bazel报这方面的问题,设置一下cxx_builtin_include_directories即可。
__float128只存在于X86体系下。如果报错,多半是工具链没有设置到aarch64的头文件路径下。
编译python包的话,还需要相应平台提供python-dev的环境,不然这些也要自己搞定。
参考:
https://bazel.build/tutorials/cc-toolchain-config
Bazel Tutorial: Configure C++ Toolchains
https://github.com/bazelbuild/bazel/issues/1353
Using bazel to cross-compile tensorflow for other targets.
https://www.cnblogs.com/jojodru/p/7744630.html
在Ubuntu 16.04上使用bazel交叉编译tensorflow
TensorFlow高层封装
目前对TensorFlow的封装如下所示:
1.TensorFlow-Slim。主要提供了层一级的封装。粒度和OpenVX类似。
2.tf.contrib.learn(之前也被称为skflow)。提供了类似sklearn的接口。
前2个是TensorFlow自带的封装
3.第三个是TFLearn。在tf.contrib.learn上的封装。需单独安装:
sudo pip install tflearn
http://tflearn.org/
4.Keras。
5.TensorLayer。这个的封装粒度介于TensorFlow-Slim和TFLearn之间。
https://tensorlayer.readthedocs.io/en/stable/user/tutorials.html
这个Tutorials的内容比较多,除了常见的CNN、RNN之外,还有RL和DAE的内容。
6.Pretty Tensor。来自google的TensorFlow封装。
https://github.com/google/prettytensor
7.Sonnet。来自Deepmind的TensorFlow封装。
https://github.com/deepmind/sonnet
参见:
http://www.infoq.com/cn/articles/introduction-of-tensorflow-part06
深入浅出TensorFlow(六)TensorFlow高层封装

您的打赏,是对我的鼓励